Sunday 27 January 2013

Birthday Haul (and a Warlock)

First of all a big "Hello!" to my 2 new followers!

On Friday it was my birthday. The big 2 7 and dear God do I now feel like an adult! Primarily because I hardly got any presents :( However the presents I did get were pretty damn awesome and all down to my loving (read patient and accommodating) girlfriend Jen!

At Christmas she got me some paints and basing materials but she's really stepped it up for my birthday. Check out all of my goodies!

Pretty good huh?!

So, first of all I need to congratulate her on getting me something that I've never seen or even heard of; the 'Eavy Metal Edge Highlight Kit. The kit consists of 9 paints that have been requested by the 'Eavy Metal team for extreme edge highlights. So far I've used them to lighten up my highlights rather than using white. They give a really good pastel colour to your highlights making them blend in waaaay better.

Secondly more basing material is always good and I LOVE basing snow but have never owned any snow flock. Now I do! You also get some little plastic icicle sculpts in there. Me thinks some Space Wolves may be in order to make use of these beauties! My only snag with these little kits is that they are stupid expensive (£20!!!). A fact I pointed out to my GF to which she countered "That's why they're good to get as presents"......"Touché" said I.

Thirdly, the High Elf Dragon. I'm not ashamed to admit that I'm a little intimidated by this beast. It's big, stunningly sculpted and if I make a mess of it Jen will literally kill me.......I think I'm going to save it until I'm OK with using an airbrush. I want it to look awesome and every Dragon I've ever seen that looks good has been painted with an airbrush (plus, I can't face painting wings with a regular brush!).

Lastly an honourable mention needs to go out to a non miniature related presents....

Just Awesome...

We saw this t-shirt on Think Geek and it had me absolutely cracking up (Jen didn't get it) so she bought it for me. All in all a good amount of hobby related birthday gifts. I have to say though, nothing will ever beat an Xmas present that Jen got me a few years ago....

More Awesome....

I don't get really excited by a lot but this model nearly brought me to hopeless nerd tears of joy! Such an awesome and iconic sculpt but I just can't bring myself to paint it. I started the base coat but lost courage half way through and now I'm ashamed to see dust piling up on it obscuring all the details. Maybe I'll give it a clean with the airbrush once it arrives and steel myself to start again. I just really don't want to mess it up.....

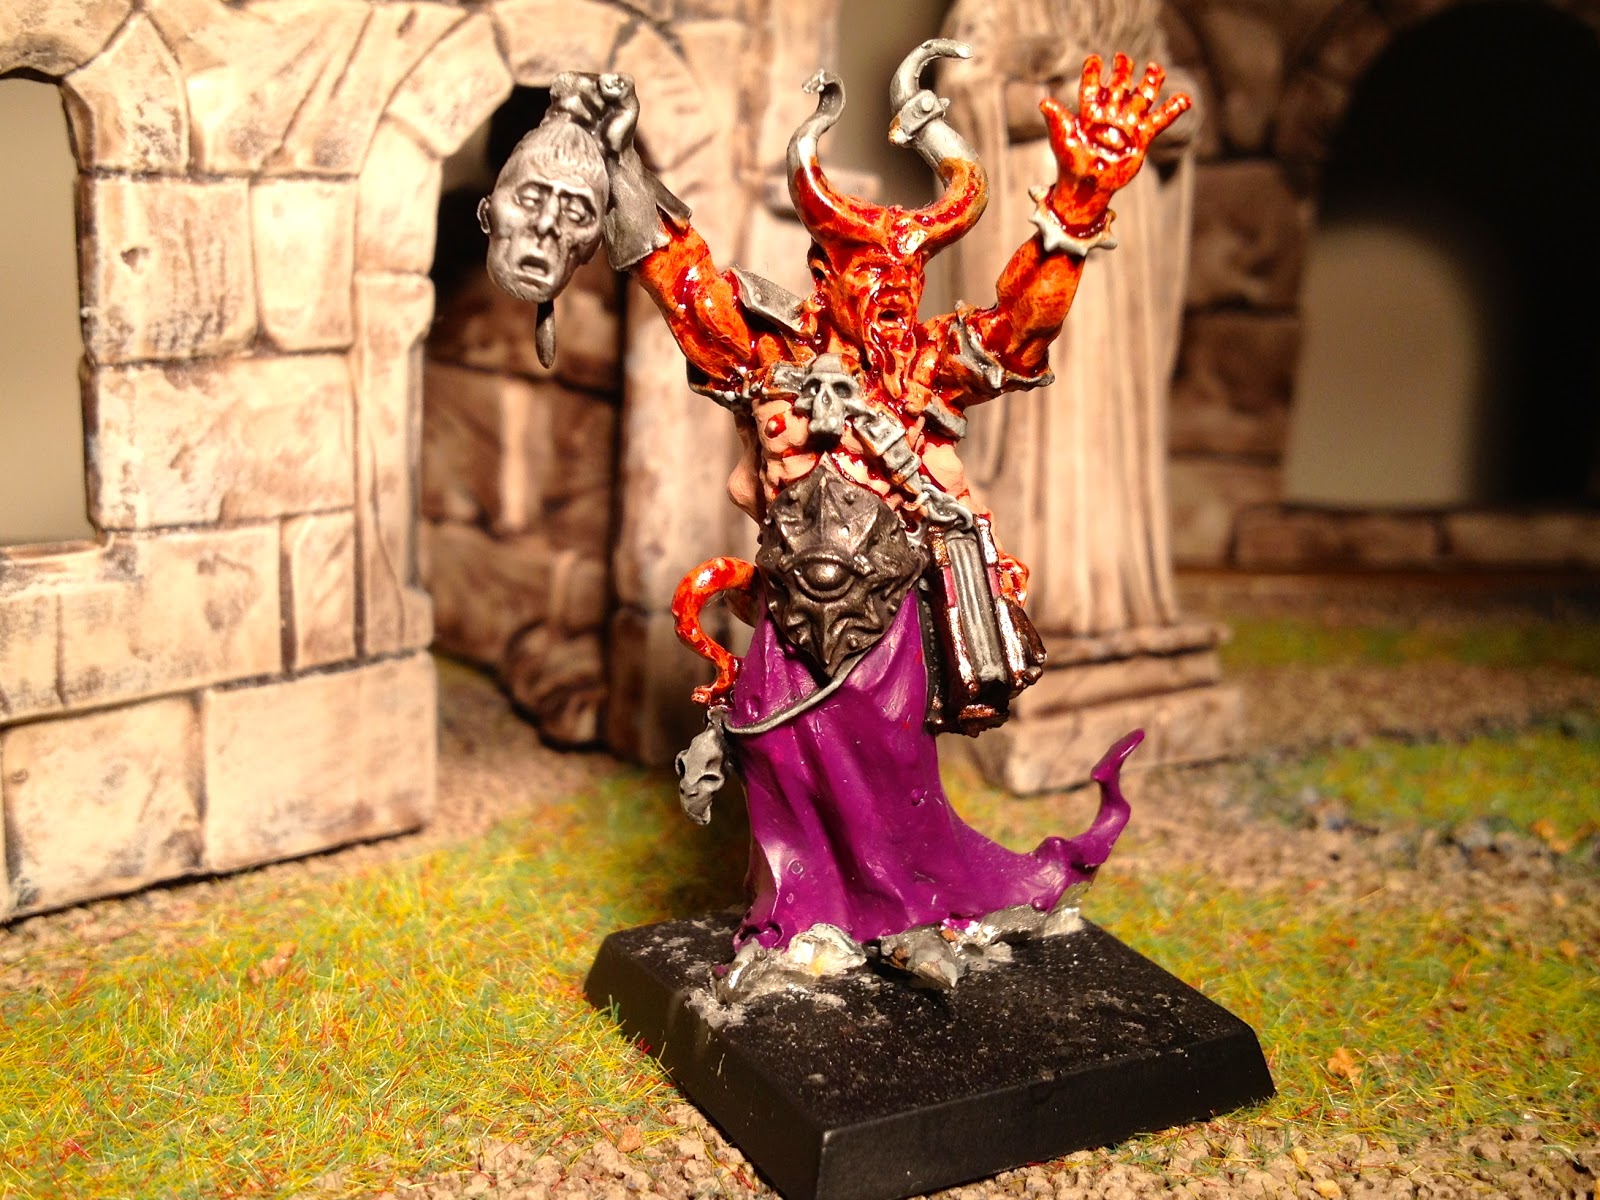
Now that my birghday ravings are over I have actually managed to finsih one of the projects I have on the go. Behold my Skaven Warlock....


And here he is! I'm actually really happy with the end result of this model. There were certain parts during the painting that I wasn't too sure how he would turn out but I think the mix of colours work really nicely with a few little splashes of colour. Since most of it is quite muted though I think the warpstone really pops! I used some of my new edge highlight paints to get the warpstone effect, using it to lighten the Moot Green I used as the top layer. As I said previously it just seems to blend a little nicer and allowed me to get a more 'cloudy' look to the warpstone globes. 

I also took my first foray into more advanced painting techniques. I tried out some object source lighting (or OSL for the cool kids) which turned out OK I think...


I think it works really well on the globe on his back but I couldn't seem to get the paint on his halberd to feather properly. I was thinking whilst I was doing this though that if I don't try these techniques I'll never get better at them and for a first attempt I learned a  lot about the application of the paint, consistency etc. My next try will be better!

The base was another whittled piece of wood with added flock, plants and secret recipe basing material....more on that later.

Anyway, what do you guys think? Comments and suggestions are super welcome as they'll only help me to get better!

Cheers
Phil

Saturday 26 January 2013

A Base To Display Stuff On

Hello again!

When I started painting again, about a year ago, I wanted a base that I could display my finished High Elf army on. What I decided to do was make a trip down to Poundland and get some cheap stuff to make a display base with!

I came back with a children's chalkboard set, some cheap brown test colour paint, some big, cheap paint brushes, a bottle of PVA glue and a small bag of sand. After dropping the extortionate amount of £5 on all of my materials I went home and set about creating my base. Using the chalkboard as the base I covered it in PVA and poured the sand on top. Once that Had dried I painted it all brown, dry brushed it a little and covered it in some left over flock I had. 

And this was the result...

Not bad for a fiver!

As you can see I also added some green stuff flooring in the centre to add a little different texture to it. If I'd actually thought about the placement of the grass, mud and stone I may have made it look a bit more natural but amidst all of the glue, paint and flock I got a little carried away and the results look a little haphazard. However, when I have miniatures on there all based up it does the job admirably.

I also wanted some backdrop scenery for it too so I got myself the Osgiliath ruins box set. A little pricey as with all GW scenery but the sculpts were perfect for what I wanted and could be reused for any of the (rare) games I manage to play.

Here's some pics...


I painted the scenery using Dheneb stone base coat, a Devlan Mud wash and then dry brushed Dheneb Stone again. The effect was really good I find. Especially since it's just incidental scenery. I added a little extra to it today as well; I painted a little Biel Tan Green shade into some of the recesses and then glued some flock on top to add the appearance of moss growing in the cracks of the ruins. I think it looks pretty good actually but it's are still missing something like some vines or ivy. Does anyone know of a good UK supplier that sells ivy-like  basing materials? I can only find American suppliers and boy do you pay for the shipping!

I've still got a couple of bits of scenery from the box set to paint up so I can switch up the scenery types on the board as I now use this to take all of my pictures on for this blog! It makes them look a little more interesting than they otherwise could without any kind of backdrop!

Hope you guys like it!

Phil

Thursday 24 January 2013

Prepping and Procrastinating

Hello!

Well, I said that I would have the two projects from my previous post done by now but.....they're not. I did other stuff instead! Mainly prepping the next thing on my to do list in preparation for me getting an airbrush next week. Woohoo! 

The first step of the preparation was this....

Can you tell what it is yet?!

Using cheap, Asda all purpose cleaner I covered the entire thing and left it for 24 hours to stew. I then frantically attacked it with an old toothbrush to remove the hastily slapped on paint from my youth. Lo and behold, underneath the caked red paint and sloppily applied super glue I found a priceless gem.....

What you looking at?!

An old school, metal Furioso dreadnought! I actually pulled the entire thing apart to make it a lot easier to paint and I found this inside the chassis;

That's right, 10 years old!

Now, I realise that 1993 isn't actually that old but I remember buying this as soon as the model was released and being so excited because it had 2 power fists! 2 of them! But that was ten years ago, I'm nowhere near as excited by power fists now......OK, fine, I totally am. So what?!

Anyway, I decided that this was going to be the first test subject for my new airbrush when it finally arrives sometime next week. Im not really sure what kind of colour scheme I'm going to go for as it's got no Blood Angels iconography on it so it could be from any chapter. Any suggestions? I'm thinking something very different from BA because this model has already been red in it's past life and I'd quite like it to be a reasonable departure from its previous existence.

What I do know is that I'm also going to be trying out some weathering techniques with this bad boy so thanks in advance to Sheep at Forlorn Hope for the weathering tips (seriously, if you want to see how it's done check out his Sons of Horus army, simply awesome!). 

Not really sure how this models going to turn out as everything I have read on the inter web leads me to believe that your first attempts at airbrushing are going to fail.....spectacularly! So if anyone has any pre fail tips for me they would be greatly appreciated!

I have the next few days off so hopefully I'll be able to get the ratman and sorcerer to some kind of end point and I'll post them up ASAP.

Bye for now!
Phil

Monday 21 January 2013

Sorcerers and Skaven

Hi all (4 of you....)!!!

A really slow week on the painting front on account of being an adult and having to work so I can buy food and other boring necessities. I have however managed to get a couple of my on going projects a little bit further on. 

I mentioned in my last post that I have a couple more of the exclusive Games Day miniatures from previous years. Well the two that I have left form the core of the two projects that I am currently working on and by happy coincidence I have some WIP pictures of them! Hooray!

First up I've been preparing the Chaos Sorcerer from 2010. I decided I was going to actually fashion a base out of wood, green stuff and some chaos bits as the mini looks like he is performing some sort of foul ritual and he would definitely be doing that in some kind of shrine right? 

Here are the results so far...


Chaos Shrine


So, I made the circular dais using a piece of MDF, a saw, a sharp knife, a file and a lot of patience! All in all I think the stone effect Has turned out pretty nicely although I think I may need to highlight it a bit more as it looks a little "muddy" at the minute (probably due to the copious use of Devlan Mud but hey ho...)

The candles were made from green stuff and, since I don't actually do a lot of sculpting work, I think they look quite convincing. I particularly like the small spot of yellow I have in each candle that surprisingly looks like they are lit. Alas, you cant see this in the photo though...

Finally i added some Tzeentchian glyphs on the converging points of the pentagram as if they are collecting the blood coming from the spike in the centre. All in all I'm fairly happy with the base!

Now for the guy that's going to be standing on it....

Games Day 2010 Chaos Sorcerer


As you can see I'm mid way through painting him and actually got called away mid way through doing the base shading of his flesh. I'm going for a really raw, mutated look to his flesh hence the angry red base coat. I'll be highlighting up to a blue from the purple on the robe to try and create the classic mix of colours adopted by Tzeentchian sorcerers.

Lastly I added a head to his gripped hand and sculpted some hair (seen best from the back). I imagine the head will soon be plunged onto the spike in the centre of the base as part of the ritual!

Hopefully this will be finished off by the end of this week as I have a fairly sizeable little holiday booked in around my birthday that I plan to fill with modelling and painting I never usually get to do.

This brings me to my second little project.....

Games Day 2011 Skaven Warlock


I really love this model. It has a really great cowering posture going on (not shown in the pictures is the large shield he carries which is not attached for ease of painting). He also has lots and lots of really intricate machinery connected to him that I could paint a nice bronze. He's still not totally done. The staff needs to be done as does all of the warp stone and a few pouches.

The only thing I can't decide on is his base. I want it to be pretty cool. I'm thinking a large stone with lots of reads and grass with rats hiding in the foliage. What do you guys think?

So thats what I've been up to. Hopefully have these done in the next few days and I can move on to some of the bigger projects I've got my eyes on. More details in future posts as well as the finished pics of these two.

Let me know what you think so far...

Cheers
Phil

Thursday 17 January 2013

Games Day Black Orc

When I was a kid I used to go to Games Day every year and of course every year you would get the free Games Day miniature with your ticket. Alas, every year I would also systematically butcher said models in my youthful enthusiasm to get everything painted. All but one miniature survived...

The Black Orc model was never touched as I assume it was at the point where I lost interest in tiny painted beasts and focused my energies on considerably more dangerous things. Girls!

Anyway, I have recently finished a project to get this Orc out of the drawer of forgotten miniatures and actually get it painted. I apologise in advance for the photos, I couldn't seem to get the camera to focus close up.

Games Day 2000 Black Orc


And there he is, I'm particularly happy with his armour which was achieved using a combination of washes and dry brushing to get a battered, dirty kind of look which is much easier to see on the actual model than in these pics. I also fixed up a nice little scenic base for him made up of a piece of MDF, some GW scenery pieces and some wasteland tuft!

I have a couple of more recent Games Day minis ready to be painted so hopefully I'll get those up pretty soonish.

Cheers!
Phil

Monday 14 January 2013

Games Day 2011 Challenge

So a couple of years a go I went to Games Day with a friend (Adam from ilikepaintinglead). Throughout the day we managed to not partake in any of the games, studios or activities through a mix of fear, shame and awkwardness! We decided that next year we would definitely get involved. As a result we bought a box set between us (the Island of Blood set no less!), and vowed to each paint up an army and play a game at next years Games Day. We didn't. In fact we did exactly the same as the first year. Oh well, there's always next year...

In 2 years Adam has managed to paint about 4 skaven and a rat ogre as he keeeps getting distracted by other, older miniatures (most of which are featured on his blog). I on the other hand have painted about 3 quarters of the minis in my army (one of which happens to be featured in my previous post). I thought maybe I'd post my current progress. 

Here are some pics of the finished Swordmasters unit;


And a fully painted unit of Elyrian Reavers;


That's how far I have got so far. I've actually got the majority of the archers from the set done as well but I'll wait until I've completed the entire unit of those before I post them. The swordmasters were actually the first models I had painted for years so I'm actually pretty happy with them. The reavers on the other hand are OK but there are a few bits, like the white and the horse flesh, that I'm not overly happy with but they are most definitely table ready. As I finish more units I'll post them too. As always, comments are most welcome!

Cheers!
Phil

Thursday 10 January 2013

First Post (and a Griffon!)

So, this will be my first time blogging... Seems a little weird to be currently speaking to no one but I created this blog to motivate myself to paint so I guess that's OK.

For the first post I wanted to show a model I have just finished. I only very recently (in the past year or so) really got back in to painting after a long absence. I've painted a few things here and there but not any where near as much as I am now. I think this model is me starting to get back to the standard I could paint at back in the day. Quite fitting then that it would be the first to appear on my blog! I'm still not totally happy but close enough for now I think.

Without further a do here are the pics!


So there it is in all it's glory! The High elf lord riding a griffon from the Island of Blood box set. I have to say that the mini was an absolute pleasure to paint and I flew through it in about a week (which for this size of model and the actual time I get to paint is damn speedy!). I really loved doing the front of the bird and the rider, amazing detail throughout the entire sculpt making it really easy to shade and highlight. The only part I struggled with was the lion portion of the model. I could never seem to get the colours right and the shading just seems to deep. However, it does look a whole lot better now I've got the matt varnish on it.

Post number one is now done! Any feedback on painting or pics (as long as its constructive mind you) is more than welcome. Hopefully I'll manage to post at least one thing a week and I'll be able to track my progress, at the very least WIP updates on my current projects will be forth coming. Maybe I won't be talking to myself by then too.....

Cheers!
Phil

Related Posts Plugin for WordPress, Blogger...